

I just finished shooting a four day time-lapse project at the Miami Boat Show for one of my new clients Meridian Yachts. Our goal was to show the 3 day set up process, which no one visiting the boat show gets to see. It’s fascinating to watch the Miami Beach Convention Center transform from an empty cavernous warehouse to the biggest boat show in the States. In my research I have found numerous video tutorials, examples, web posts, … on time-lapse projects; but I have not found one that speaks about the process of preparing to shoot one in detail. This blog post will talk about how I planned, produced and photographed a commercial time lapse and how I put it all together after all the pieces were been shot.
1. Plan it
Scouting the location
I’m gonna assume that you already have a project in mind. So the first thing I do is to scout the location that I will be shooting in. What is the subject that you’re going to be shooting? Where will it be? Are there vantage points that will become obstructed in the course of your time-lapse? Is your location accesible? Do you need to get to the camera to change batteries, cards, … Is there a way to get around power and storage requirements? Is access restricted? Who will guard the equipment for the duration of the time-lapse (in our case it was 4 days). Shoot photographs and look at your field of view.
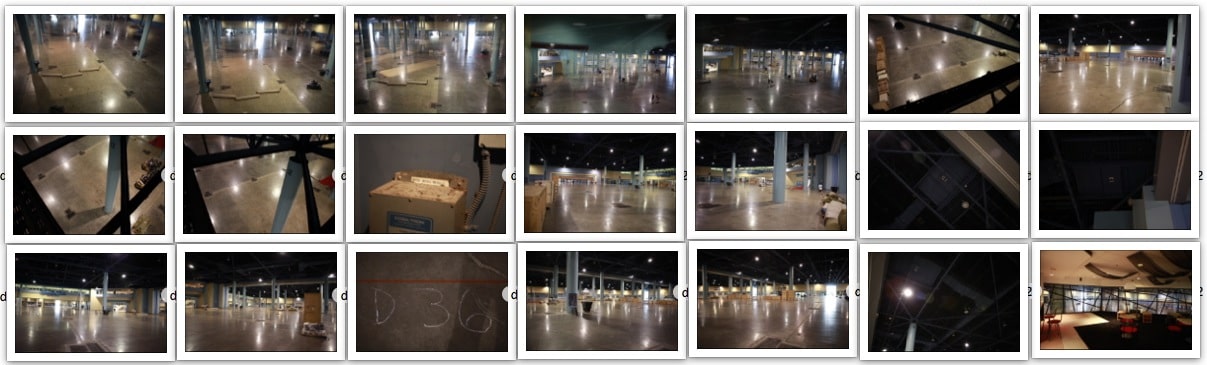
Now you’re ready to have an intelligent discussion with your client. Why have you picked the location that you’ve selected? Remember once you start shooting, you can not change your location or you’ll ruin the time-lapse, so be careful where you set up. In our case there where 3 possible locations:
• a business center that was too far away to get a good angle on the clients booth
• a restaurant that was not going to be in use during the time of set up, but was directly behind the booth
• the cat walk directly above the booth
But I still checked all 3 possible locations to make sure that I was picking the correct one. The restaurant was going to give us power and a place to keep our set up overnight, without the risk of someone disturbing our set-up. The client had coordinated with the show’s organizers to get me access in these restricted areas. Get to know the person who is in charge of security and the access to the off limits portions of the building and become their friend. They will be invaluable during the project. (Special thanks to Venus from the boat show, by the way who was never to busy to get me security, engineering, access, … she made this project run smooth. You rock!)
Do the math
You’re gonna have to figure out how long the finished piece is going to be. What frame rate will in play at? In our case it’s between 2 1/2 min to 5 min. I suggested shooting enough photographs to run at 60 fps. [5 min * 60 sec * 60 fps = 18,000 images].
Now take a look at how long your event it going to be. In our case 4 days. The first day will be 10 hours, the second and the third will be 8 hours and the last one is 4 hours. [10+8+8+4 = 30 hours * 60 min = 1800 min * 60 sec = 108,000 sec].
No all that’s left is to divide the number of seconds in your event by the number of images needed in your project and you’ll know how many seconds you have in between shots. 108,000 / 18,000 = 6.
Double check your math, for real.
Now for the important part: TEST YOUR CAMERAS SHOOTING SPEED! How large of a file writes to what speed of card in what length of time. You don’t want the buffer to fill up and mess up your time-lapse project. In our case we’re shooting sRAW (~10 MB) tethered to the computer using a software to fire the shutter, more about all that later; but it turns out that the speed from one frame to the next is 7 sec for that set up. Which is fine, since we are shooting for a 2 1/2 – 5 min project that will have B-roll to intercut with the time-lapse. But you want to know that before you begin shooting. If you’re shooting to a card, you’ll want to figure out how many images can be stored on the card before it is full and messes up your time-lapse. What about power? Did you think of that? How long can the camera run on one battery or two batteries in a vertical grip or do you have a power adapter for your camera?
How much power do you need?
One battery is going to interrupt your time-lapse. You’ll have to stop shooting to replace the battery. A power adapter is great to have, but we couldn’t get one in time. The vertical grip doubles your battery life, but when you open the door to switch batteries, that shuts off the power too, however thanks to a little research on google and melandercl on the timescapes.org forum there is a hack on how to keep the door open and the power on. Read the post for all the details, but the short version is open the battery door, find the little button on the top left side of the battery grip that gets engaged by the door, push that (the cap of a ball point pen works perfectly) and turn on your camera. Voilá! Camera is powered up with the open door. Now write “DO NOT CLOSE” on a piece of tape and stick it on the inside of the open battery door, I’m just sayin’ old habits die hard. Thanks to the battery door hack (thank you melandercl!) we have unlimited power, because the third battery in the charger is charged much faster than the two batteries in the grip will run out of power. Have a system in place to know which is the last battery you swapped out (right in the morning, left in the afternoon) or what ever works for you.
Power savings
Even with the battery solution we want to limit the amount of power the camera draws. Here are some settings you can change to prolong the battery life:
• Turn Live View off. Although it’s cool to watch each shot as it comes in – nothing drains the battery more than having the LCD screen on for 4 days. Just don’t turn Live View on. If you’re software (like the one I used) defaults to Live View on – disable it.
• Turn Image Review off. You’re not going to be watching the camera screen, so why have it fire up every 7 seconds to display an image. You can do this in the first camera screen of the menu under review time. Turn it to ‘OFF’.
• Turn the meter off – unless your shooting in AV mode (more about that later as well). If your on Manual exposure – the light in the scene I was shooting did not change, so why would you want to meter something that you know. The closest you’ll get to this is in the ‘Live View/Movie func. set.’ in the second wrench window of the menu. Inside there you’ll find ‘Metering Timer’ – set it to 4 sec. the shortest time available. If you don’t hit the shutter button, the meter should stay off anyway.
Will you run out of storage?
Once you have the amount frames figured out, you can extrapolate your power and storage requirements. How much fits on your storage medium (in our case a 1 GB external USB 2.0 drive) more than enough. But know how many hours it will take the camera to fill up your card, if you’re shooting to one. In our case it would have taken almost a week of shooting 24 hours to fill up the drive. We did shoot to two separate drives Day One to drive One, Day two to drive Two, Day Three to drive One and Day four to drive Two. That way you can back up the previous day to a separate hard drive that lives somewhere else – in our case that was a 1.5 TB HD.
Go on reading how to pack for a commercial time-lapse project on Wednesday.

[…] I’m not going to go into all the planning portions of this time-lapse – you can read how to plan for a commercial time-lapse project if you want more details. There are also some excellent tutorials on time-lapse photography, check […]
[…] been reading about all the planning that goes into a commercial time-lapse project and I have also broken down how to pack for a multi-day photography assignment like this. I will […]
[…] hadn’t specified that we’re gonna be shooting a time lapse, I had not brought my usual time lapse DSLR setup that I’ve written about before, but had my GoPro Hero 3+ (@GoPro) in my kit. Even with an extended battery the camera will shoot […]